Projection Screen Manufacturer
Home 中文版 English Site Map  
JUMBO News Products Patent OEM/ODM Technical Support Contact Us
Categories
Electric Projection Screens
Manual Projection Screens
Tripod Projection Screens
Pneumatic Screens
Electric Tab-Tensioned Projection Screens
Electric Floor Rising Screens
Folding Screens
Fixed Frame Screens
 
Electric Curtain
Curtains
Curtain fabrics
Center Open Curtains


Technical Support

Home > Technical Support

 
Notice:
1‧For maintaining product’s quality, non-professional person please do not disassemble the product.
2‧In order to avoid electric shock and fire hazards, please do not expose this product to rain or moisture.
3‧After the installation is completed, please do not climb on the screen or use the screen as a fulcrum to avoid the risk of falling.
4‧To protect children from the operation of the controller and a remote control and to avoid damage caused by improper use.
5‧Please do not expose screen to air for long time, so that this will not make the screen oxidizing, covered with dust and accelerated its aging.
6‧If you buy pearl screen, please avoid touching directly on the screen surface, so as to avoid falling its beads.
1‧Installation for External Type
Step 1
Install the slide mobile hook horizontally on wall or ceiling at the location that is needed for screen.
Step 2
After the mobile hook is located, then hang the screen directly.
Step 3
Then pull out the mobile button on the top of hook and buckle into the main track of the top of the screen.
Steep 4
Wrench the screws on buttons of the hooks on both sides.
Step 5
Connect the power cord and the line of control that the installation is completed.
 
2‧Installation for Concealed type

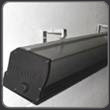
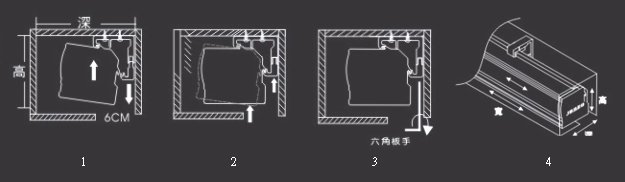
Install screen:According to different installed environment, it is free to adjust the location of the screen, the screen can be adjusted left or right to a fixed location.
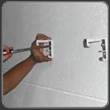
1‧After mounting the bracket, put the track of main screen respectively into the slide groove on the top of hooks and fix the two sides.
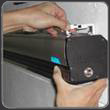
2‧And then pull out the spring-buckle and clip the spring-buckle into the rail system. on the back of the screen respectively.
3‧Hang the main screen and adjust the location of the screen to a fixed position.
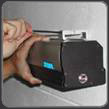
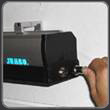
4‧Use hex spanners to tighten the screw on the button.

3‧FIXING - Motor Setting
Setting:
Motor setting is divided into UP A & DOWN B two control parts.
At the bottom of the screen, the screen exit, there are a red hole and a white hole.
Please use Hex Wrench to set upper and lower limits.
UP A Maximum setting (do not set up if nonessential)
1‧Facing the front of the screen outlet (Red hole).
2‧A is up limit setting, and divided into A+ and A-.
3‧The screen will be rolled up less if you turn to A+ direction.
4‧The screen will be rolled up more if you turn to A- direction.
5‧There are 2.5cm by turning a full circle each time.
DOWN B Minimum setting (do not set up if nonessential)
1‧Facing the front of the screen outlet (While hole).
2‧B is down limit setting, and is divided into B+ and B-.
3‧The screen will be rolled down more if you turn to B+ direction.
4‧The screen will be rolled down less if you turn to B- direction.
5‧There are 2.5cm by turning a full circle each time.
The illustration of motor setting (When you set the motor,you do not need to dismantle the outer shell of the scree,and just use the hexagon spanner such as attachment.)
Electric projector fixing internal diameter
Model fabric size outer shape size Model fabric size outer shape size
cm cm cm cm
W×H W×H×D W×H W×H×D
JSV-E75 152×114 175×15×18 JSV-E180 366×274 388×18×25
JSS-E60 152×152 175×15×18 JSS-E144 366×366 388×18×25
JSV-E90 183×137 205×15×18 JSV-E200 406×305 440×18×25
JSS-E72 183×183 205×15×18 JSS-E160 406×406 440×18×25
JSV-E100 213×160 236×15×18 JSV-E220 447×335 480×25×30
JSS-E84 213×213 236×15×18 JSS-E176 447×447 480×25×30
JSV-E120 244×183 266×15×18 JSV-E240 488×366 520×25×30
JSS-E96 244×244 266×15×18 JSS-E192 488×488 520×25×30
JSV-E135 274×213 297×15×18 JSV-E260 528×396 570×25×30
JSS-E108 274×274 297×15×18 JSS-E208 528×528 570×25×30
JSV-E150 305×228 327×18×25 JSV-E280 569×426 610×25×30
JSS-E120 305×305 327×18×25 JSS-E224 569×569 610×25×30
JSV-E160 325×244 350×18×25 JSV-E300 610×457 645×25×30
JSS-E128 325×325 350×18×25 JSS-E240 610×610 645×25×30

16:9

JSH-E75 174×193 200×15×18 JSH-E135 306×268 335×18×25
JSH-E90 207×212 235×15×18 JSH-E150 340×286 370×18×25
JSH-E100 229×224 255×15×18 JSH-E180 406×324 435×18×25
JSH-E120 273×249 300×15×18      
Jumbo manual projector screen fixing internal diamete
Model fabric size outer shape size Model fabric size outer shape size
cm cm cm cm
W×H W×H×D W×H W×H×D
JSS-M72 183×183 200×15×15 JSV-M120 252×188 270×15×15
JSS-M84 221×221 240×15×15      
Jumbo electric tab tensioned projection screen fixing internal diameter
Model fabric size outer shape size Model fabric size outer shape size
cm cm cm cm
W×H W×H×D W×H W×H×D
JSV-E92 206×228 243×18×18 JSV-E100 223×240 259×18×18
JSV-E120 266×271 303×18×18      

16:9

JSH-E92 223×202 260×18×18 JSH-E100 241×212 277×18×18
JSH-E120 285×237 322×18×18